Test Sequence Basics
A test sequence consists of test steps arranged in a hierarchy. You can use a test sequence to define test inputs and to define how a test will progress in response to the simulation. A test step contains actions that execute at the beginning of the step. A test step can contain transitions that define when the step stops executing, and which test step executes next. Actions and transitions use MATLAB® as the action language. You create test sequences by using the Test Sequence block and the Test Sequence Editor. See Use Stateflow Chart for Test Harness Inputs and Scheduling.
Test Sequence Hierarchy
Test sequences defined in Test Sequence blocks can have parent steps and substeps. Substeps can activate only if the parent step is active. A group of steps in the same hierarchy level shares a common transition type. When you create a test step, the step becomes a transition option for other steps in the same group.
Test Sequence Scenarios
In a Test Sequence block, you can define multiple test sequences, which are called test sequence scenarios. By using scenarios, you can define distinct test sequences without having multiple Test Sequence blocks in your test harness. You can run test sequence scenarios in these ways:
Activate a single scenario from the Test Sequence Editor and run the model
Activate a single scenario using API commands and run the model
Control the active scenario with a workspace variable and run the model
Use a custom test script to loop through scenarios when running the model
Define iterations in the Test Manager to run more than one scenario in a single test case
For more information and examples of using test sequence scenarios, see Use Test Sequence Scenarios in the Test Sequence Editor and Test Manager and Programmatically Create and Run Test Sequence Scenarios.
Transition Types
Test sequences defined in Test Sequence blocks transition from one step to another in two ways:
Standard transition: You can define a sequence of actions that react to simulation conditions using a standard transition sequence. Standard transition sequences start with the first step and progress according to transition conditions and next steps. For a list of transitions, see Test Sequence and Assessment Syntax.
This test sequence sets the value of Boolean outputs
RedButtonInandGreenButtonIn, with transitions happening after each step has been active for 1 sec.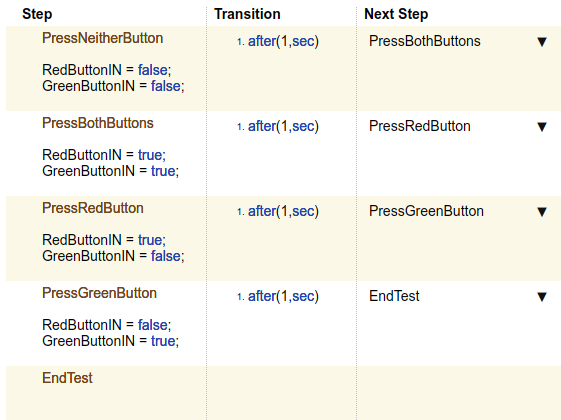
When decomposition:
Whendecomposition sequences are analogous to switch statements in programming. Your sequence can act based on specific conditions occurring in your model. In aWhendecomposition sequence, steps activate based on a condition that you define after the step name. Transitions are not used between steps.This When decomposition contains three
verifystatements. Eachverifystatement is active when the signalgearis equal to a different value. For more information, see Assess a Model by Using When Decomposition.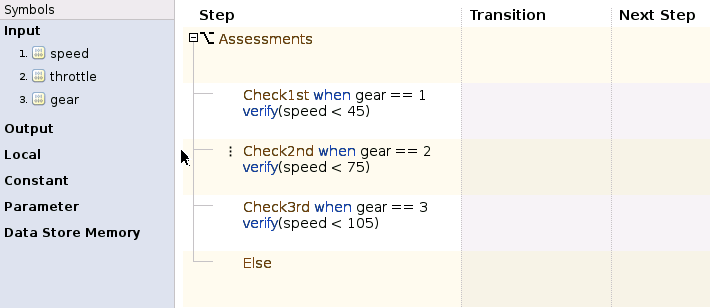
Create a Basic Test Sequence
In this example, you use a Test Sequence block to create a simple test sequence for a transmission shift logic controller.
Open the model. At the command line, enter
openExample('TransmissionDownshiftTestSequence')Right-click the
shift_controllersubsystem and select Test Harness > Create for ‘shift_controller’.In the Create Test Harness dialog box, under Sources and Sinks:
Select
Test Sequencefrom the source drop-down menu.Select Add separate assessment block.
Select Open harness after creation.
Click OK. The test harness for the
shift_controllersubsystem opens.Double-click the Test Sequence block. The Test Sequence Editor opens.

Create the test sequence.
Rename the first step
Accelerateand add the step actions:speed = 10*ramp(et); throttle = 100;
Right-click the
Acceleratestep and select Add step after. Rename this stepStop, and add the step actions:throttle = 0; speed = 0;
Enter the transition condition for the
Acceleratestep. In this example,Acceleratetransitions toStopwhen the system is in fourth gear for 2 seconds. In the Transition column, enter:duration(gear == 4) >= Limit
In the Next Step column, select
Stop.Add a constant to define
Limit. In the Symbols pane, hover over Constant and click the add data button. EnterLimitfor the constant name.Hover over
Limitand click the edit button. In the Constant value field, enter2. Click OK.

Create Basic Test Assessments
Continuing the example, in the test harness, double-click the Test Assessment block to open the editor. The editor displays a When decomposition sequence.
Rename the first step
Assessments.Add two steps to
Assessments. Right-click theAssessmentsstep and select Add sub-step. Do this a second time. There should be four steps underAssessments.Enter the names and actions for the four substeps.
Check1st when gear == 1
verify(speed < 45)
Check2nd when gear == 2
verify(speed < 75)
Check3rd when gear == 3
verify(speed < 105)
Else
The fourth step
Elsehas no actions.Elsehandles simulation conditions outside of the precedingwhenconditions.Add a scope to the harness and connect the
speed,throttle, andgearsignals to the scope.
Set the model simulation time to 15 seconds and simulate the test harness. View the signal data by opening the scope.

View the results of the
verifystatements in the Simulation Data Inspector.
See Also
Related Topics
You can also select a web site from the following list:
Americas
- América Latina (Español)
- Canada (English)
- United States (English)
Europe
- Belgium (English)
- Denmark (English)
- Deutschland (Deutsch)
- España (Español)
- Finland (English)
- France (Français)
- Ireland (English)
- Italia (Italiano)
- Luxembourg (English)
- Netherlands (English)
- Norway (English)
- Österreich (Deutsch)
- Portugal (English)
- Sweden (English)
- Switzerland
- United Kingdom (English)